Photo by Tobias Reich on Unsplash
What It Does
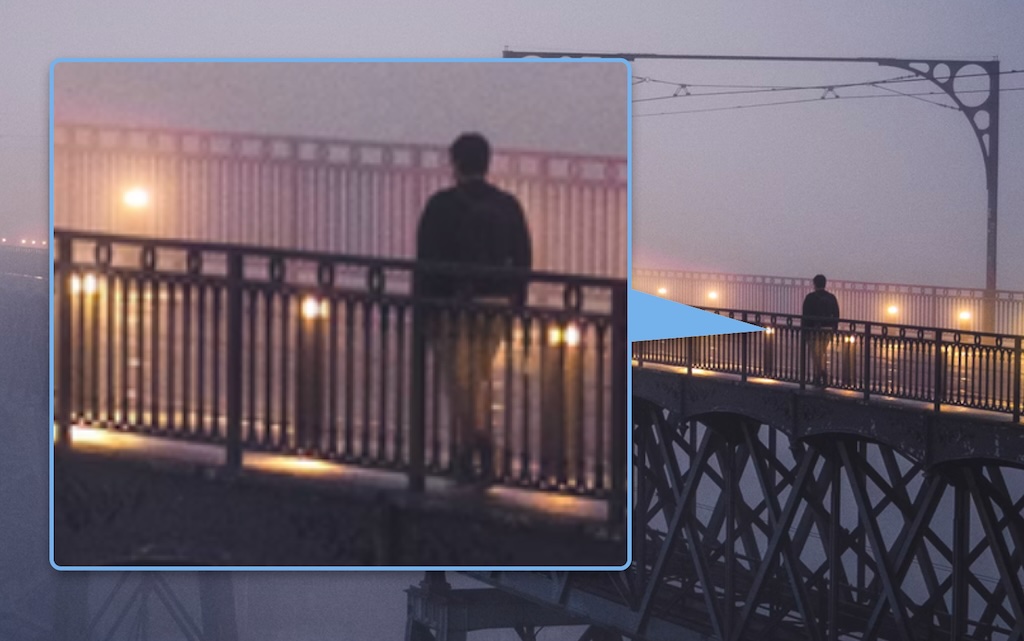
HawkEye is the “here, look at this” tool for screenshots. Drag a rectangle over the part that matters and HawkEye magnifies it into a rounded, drop-shadowed callout placed beside it. The callout and its pointer are a single silhouette — one shape, one shadow, no separate arrow graphic stuck on top — so the result reads as a deliberate annotation rather than a markup afterthought.
It’s built for documentation, bug reports, tutorials, release notes — anywhere you need to draw the eye to a small detail without making the reader hunt for it.
Two Ways In
| Entry Point | What Happens |
|---|---|
| Global hotkey controloptionshiftcommandH | Captures the display the pointer is on (via ScreenCaptureKit) and opens the editor |
| Load Image… (commandO from the menu) | Opens an existing PNG, JPEG, TIFF or HEIC into the same editor |
The capture hotkey defaults to Hyper-H and is fully configurable in Settings. The load path needs no permissions at all.
In the Editor
- Draw the source. Drag a rectangle over the region to magnify; a callout is auto-placed next to it, showing that area enlarged.
- Reposition & resize. Drag the callout body to move it, its corners to resize. The callout’s aspect ratio is locked to the selection’s, so the magnified content never distorts.
- Retarget. Drag the source rectangle to point at something else — the callout re-magnifies and re-snaps its aspect.
- Aim the pointer. Drag the pointer tip anywhere in the image; the tail rotates automatically to exit the callout from whichever side faces the tip. The marquee and handles fade out while you aim so nothing obstructs it.
- Start over. Press escape (or command.) to clear and begin again. A click in empty space without dragging is a no-op — your annotation is safe.
- Save. Save Image… (commandS) writes a flat PNG at the source image’s native pixel resolution. The selection marquee is editor-only — it never appears in the saved file.
Colour That Reads
Leave the arrow colour on Auto and HawkEye chooses an accent that contrasts with the background behind the callout — a light accent on a dark scene, a deeper one on a light scene, a complementary hue on colourful content — so the annotation stays legible on a bright UI, a dark UI, or a busy photo alike. It stays subtle, never gaudy, and re-derives as you move the callout to a different part of the image.
Prefer your own colour? Pick one from the system colour well and Auto steps aside. Either way, the chosen colour drives the pointer fill, the callout border, the selection marquee and the resize handles together, so the whole annotation reads as one palette.
Settings
Click the HawkEye icon in the menu bar and choose Settings…:
- Capture hotkey — record your own shortcut for the capture path; defaults to Hyper-H, clearable with the ✕.
- Show feedback HUD — the brief confirmation toast after a save.
- Show icon in menu bar — hide the status icon while HawkEye keeps running (still reachable by its keyboard shortcut). Persists across launches, including login auto-start. Shown only on macOS 14–15; on macOS 26 (Tahoe) and later, use System Settings → Menu Bar, which provides this natively.
- Launch at Login — start automatically when you log in.
The arrow colour and thickness are remembered in UserDefaults, so the editor opens with the settings you last used. Auto-updates are handled by Sparkle — check on demand from the menu, or let HawkEye check quietly once a day.
Permissions & Privacy
- Screen Recording — required only for the hotkey capture path, which reads a single display through
ScreenCaptureKit. macOS prompts on first capture. Loading an image from disk needs no permission at all.
No network. No telemetry. Nothing leaves your Mac except the PNG you choose to save.
Installation
Two formats on every release — both signed and notarised, pick whichever suits:
- Installer (
.pkg) — recommended for first-time installs. Double-click to run; macOS Installer places the app in/Applicationswithout quarantine or App Translocation. - Download (
.zip) — unzip and dragHawkEye.appto your Applications folder.
On first capture, grant Screen Recording permission when prompted.
Building from Source
HawkEye builds with swiftc through the shared Jorvik Make include — no Xcode project required.
- Clone the repo:
git clone https://github.com/PerpetualBeta/HawkEye.git - Run
make dev-build(arm64, Developer ID signed, Sparkle embedded) - Launch with
make run
Requires the shared jorvik-release Make include alongside the repo.
Requirements
macOS 14 (Sonoma) or later. Universal binary (Apple Silicon and Intel).